Best seller

Cement Tile Design and Production for Beginners

Course final project

A course by user2527370 surname2527370 , Carpenter, Builder, and Teacher

Carpenter, Builder, and Teacher. La Plata, Argentina.
Joined April 2020

Learn the artisanal method for making cement tiles with professional finishes

Best seller
99% positive reviews (366)
11,285 students
Audio: Spanish, English
Spanish · English · Portuguese · German · French · Italian · Polish · Dutch

About the final project for: Cement Tile Design and Production for Beginners

Cement Tile Design and Production for Beginners

“With joy I have to tell you that we have reached the end of the course. Hope you enjoyed it as much as I did. I confess that since I started preparing the course, I have made it my goal to teach you in the best way, putting sincere and true energy to reflect a real and possible job. It was a lot of work by many people who helped me understand and translate all my knowledge of this incredible technique into video format. The first thing I would like to tell you is ... Thank you for having trusted and being there until the end! I hope you carry out your own project, because I believe that real knowledge is what is passed through the body, translated into the desires of each one. Do not hesitate, start your project! I will accompany you in the forum for whatever you need. Sometimes I will not be able to answer you instantly, but I will answer all the questions. I invite you to also help yourself from all those who are taking this course. Now I share with you the step by step process of creating tiles, so that it is easier for you to remember and follow it. The first thing is to choose the reason, this part is essential because it is the image of what will remain in your project. I recommend that you look at floors, photos, posters, everything you can and make a folder with all those images or you can look at the file that I left you and that serves as inspiration.

Once you have the chosen motif, define the measure and the shape, remember that 20x20cm is the most used and has some advantages. Print it out or draw it so you can make the hoop, the next step is to build it. I recommend doing it in wood, with the system of "half wood" , and painting it with a synthetic or resistant lacquer.
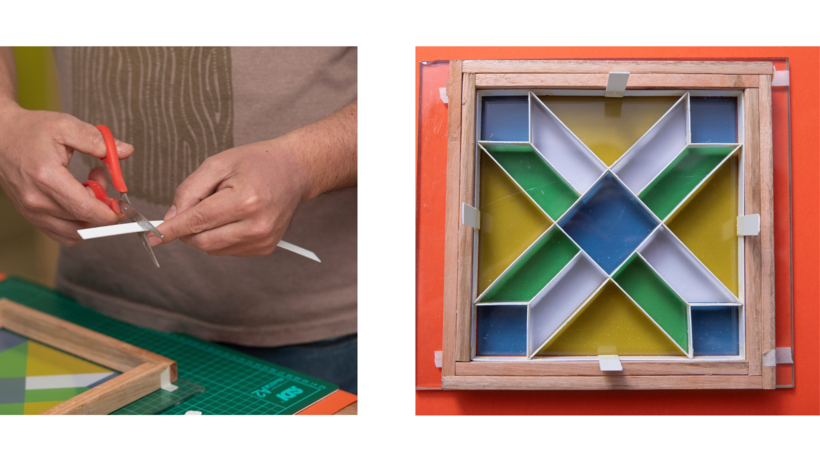
The next thing is to assemble the mold with the high impact. Keep in mind that you can use some other materials such as PVC, Spain paper or some other material that can be modeled, that is resistant and that does not have much thickness, (that is not more than 1 mm).
When you assemble the mold, do it as neatly as possible, cementing at each meeting and putting paper tape, it is essential to place it in the joints to make it resistant. Remember that the bottom edge of the mold should be straight. You can control it by supporting that edge on the frame, if necessary, rectify it with 220 grit sandpaper. Once you have your mold with the shape of the chosen motif, think about the colors you are going to use and prepare the white cement with 25% sand and a percentage of pigment or Ferriter not greater than 8%. Record all these tests in a notebook and use the scale for the measurements, so you will make it as exact as possible and you can repeat the color you like as many times as you want.
You have everything ready to fill your tile! It is best to organize everything before putting the water on, then put the 6mm glass and the 25cm x 25cm acetate (X-ray-type transparent flexible plastic) on the table. On the acetate support the frame and put tape to fix it together with the acetate to the glass.
Then put the high impact mold inside the frame checking that it is well supported on the acetate.
Once you have everything assembled, I recommend that you put water and all the colors that you are going to use in different glasses and look for the consistency like whipped cream, that is, it runs slowly through the spoon. Now you can start to put the colored cement! Remember that it must be a layer between 3 and 6mm.
The idea is to put all the colors and then arrange them in all the corners, see if any color wants to pass for a hole that should not and see containing the color that goes. If you already have all the colors as neat as possible, remove the mold slowly by pulling up.
Roll up the seams that were left. Always moving one color at a time with patience and following the idea of the motif.
The hardest part is over, now sprinkle with dry mix to fix the color. Remember that, although it is a thin layer, it makes the colored layer more resistant and serves as a fusion between the colored cement and the wet mix.
To continue, put on the gloves and prepare the wet mixture with 3 sand and 1 cement, remember that there is very little humidity and you can corroborate it with the ball point.
You have to place a little more than the level of the hoop, spread and press with the tips of your fingers, especially at the edges.
Then pass the ruler to make it smooth.
Now put an acetate or nylon, the punch and tighten it.
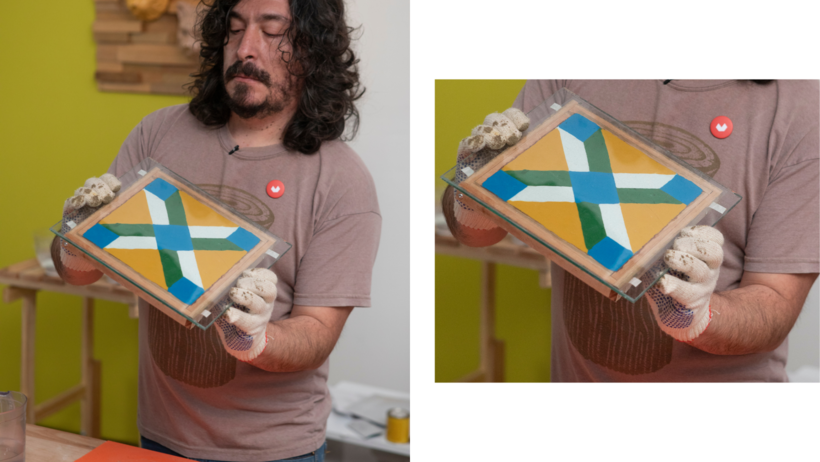
Grab everything, including the glass, and see how it will look.
Put it on the floor on a smooth surface and stand it up for 1 minute. Grab everything together again and by squeezing the punch with your thumbs, remove the frame.
Very carefully remove the punch and acetate. Let stand 24 hours in a dark place.
After that time has elapsed, submerge your tile in water.
Then remove it and immediately place it in a nylon bag.
Remember that the final setting occurs between 17 and 21 days after making the tile. After that time you can use it without problems.
Don't forget to share the result of your project! See you soon on the forum. ”

Partial transcription of the video

“Final project We're at the end of the course. Thank you for choosing it. I hope you enjoyed it as much as I did. I think it's important for you to now take on your own projects, do lots of things, experiment, try out. The idea of the course is that the floor is something that you like, that appeals to you, that has your colors, your shapes, a floor for boys or girls. It could have a bear, a fruit. If I chose this motif, I know the mold will be harder to make. We can use a 3D printer, we can ask for help if we use fine sheets or molds. All of these decisions are the first to start experiment...”

This transcript is automatically generated, so it may contain mistakes.


Course summary for: Cement Tile Design and Production for Beginners

  • Level: Beginner
  • 99% positive reviews (366)
  • 11285 students
  • 4 units
  • 14 lessons (2h 22m)
  • 15 downloads
  • Category

    Craft
  • Areas

    Arts & Crafts, Decoration, DIY, Furniture Design & Making, Interior Design

user2527370 surname2527370

Teacher Plus
Carpenter, Builder, and Teacher

During his time building houses, Juan Rossi learned the importance of materials. They must be strong, but also beautiful. Through a seemingly infinite search, he eventually found the perfect union in hydraulic tiles, thanks to their incredible durability and aesthetic qualities.

For over ten years, he has been teaching classes on how to use cement, specifically for limestone and hydraulic tiles, and how to employ different tiles in different spaces. His work can be discovered on Instagram, as well as through his own courses and products.


  • 99% positive reviews (366)
  • 11,285 students
  • 14 lessons (2h 22m)
  • 27 additional resources (15 files)
  • Online and at your own pace
  • Available on the app
  • Audio: Spanish, English
  • Spanish · English · Portuguese · German · French · Italian · Polish · Dutch
  • Level: Beginner
  • Unlimited access forever

Category
Areas
Cement Tile Design and Production for Beginners. Craft course by user2527370 surname2527370 Best seller

Cement Tile Design and Production for Beginners

A course by user2527370 surname2527370
Carpenter, Builder, and Teacher. La Plata, Argentina.
Joined April 2020
  • 99% positive reviews (366)
  • 11,285 students